Note: the accompanying code is available on GitHub.
As I wrote in my previous post:
Summer is the perfect time for some cleanup, and I’ve some older content laying around my laptop that is about time I publish!
I’m planning to cover some long-standing argument that I’ve touched over the last few years as Zebra’s EMEA Software Consultant.
I’ve been involved in multiple meetings and planning with Zebra’s partners and end-users explaining what was the best option to integrate barcode scanning functionality in a Xamarin Forms application.
This blog wants to be an in deep discussion about what I think is currently the best approach to adopt in these cases. I’m interested to get comments and feedback as this is an evolving topic!
Setting the scene
#
This is the first post of a series that want to show it’s possible to easily integrate barcode scanning functionality in a Xamarin.Forms application.
The plan is to implement an application using Xamarin.Forms and FreshMVVM, an MVVM framework that I’ve seen used in some enterprise project that I appreciate for its focus on doing few things, and doing it well.
In the next post of this series, I’m going to integrate barcode scanning functionality using Zebra’s DataWedge and its Intent API.
The final goal is to have a self-standing application that can configure the barcode scanning behavior and provide all the barcode scanning functionality needed in an enterprise-grade application.
The complete series of posts is:
Setup
#
First of all, I’m going to assume that you know what Xamarin and Xamarin Forms are. Given how fast changing the Xamarin ecosystem is, I want to document that this document has been tested with:
- Visual Studio Community 2017 for Mac - Version 7.5.1 (build 22)
- Xamarin.Android v8.3.0.19 (Community Edition)
- Android SDK Tools Version: 25.2.5
- Android SDK Platform Tools Version: 26
- Android SDK Build Tools Version: 25.0.3
- Xamarin Forms Version: 3.1.0.583944
I’m going to use some nuget packages to build the sample application:
- FreshMvvm Version: 2.2.4
- sqllite-net-pcl Version: 1.4.118
- Acr.UserDialogs Version: 7.0.1
- Newtonsoft.Json Version: 11.0.2
To test the application I’m going to use a TC56 with Nougat with BSP 01.01.49 and LifeGuard patch 7.
Note:
As this is a demo application and it’s not going to grow too much, I’ll keep all the classes in the same namespace. Keep this in mind because by default Visual Studio creates new classes adding the folder name as part of the namespace; so, for example, if you create the class Item, in the project Inventory, inside the folder “Models”, the default namespace will be “Inventory.Models”. We want to have all the classes in the same “Inventory” namespace.
Let’s start!
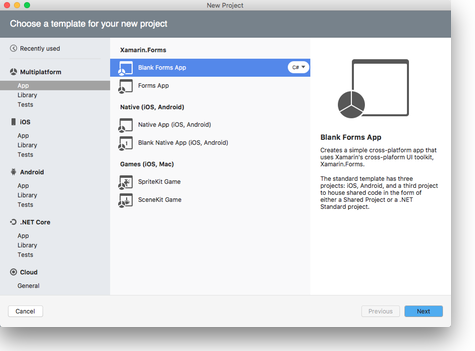
Using Visual Studio for Mac create a new Project using the template: Multiplatform app -> Blank Forms App (sorry Ugo, we pick C# for this demo):
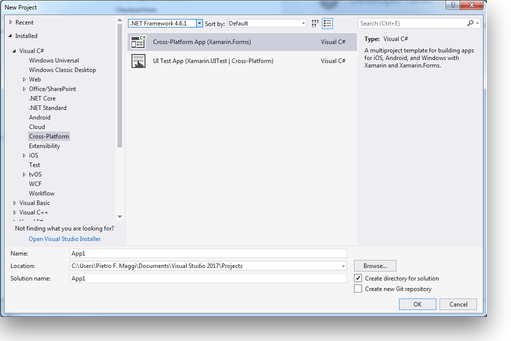
Under Visual Studio for Windows, the template is slightly different:
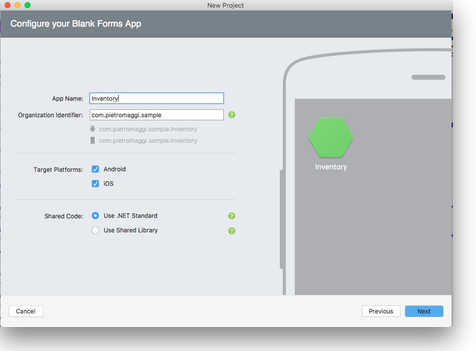
Following the template wizard, we can then chose the name of the application and its package
and where to save the project, plus some additional choice around the source control management system (git in this case):
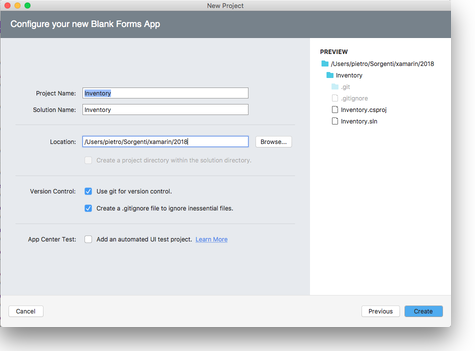
The options on Visual Studio for Windows are slightly different:
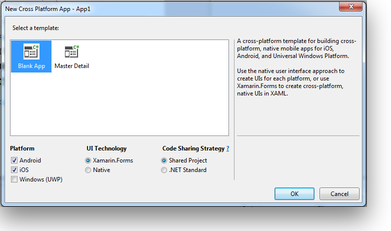
Update NuGet
#
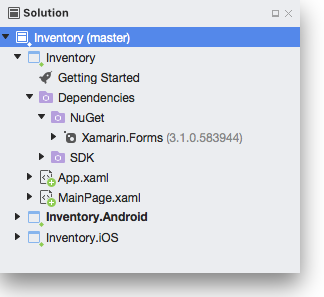
The project created by the template already includes Xamarin Forms package
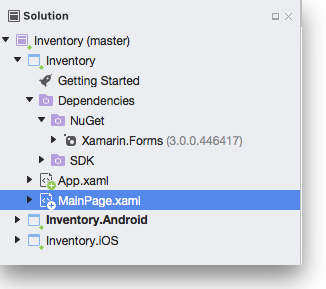
But it’s always a good idea to check if there’s an update available:
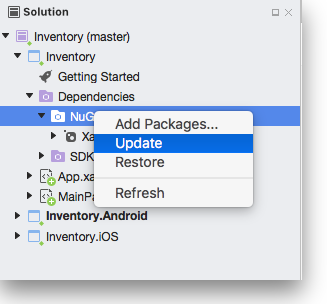
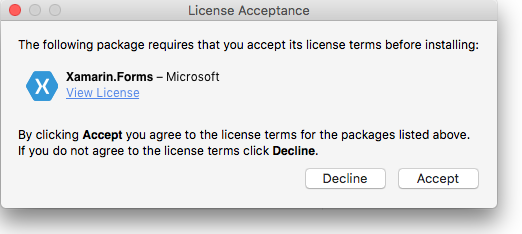
And, as it usually happens, there’s a new Xamarin Forms version, we can accept the license agreement and move on
We’ve now the latest Xamarin Forms version available in our project
Install FreshMVVM and SQlite.Net.PCL
#
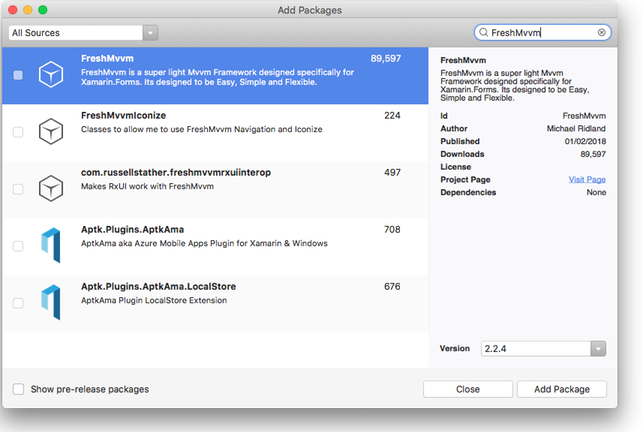
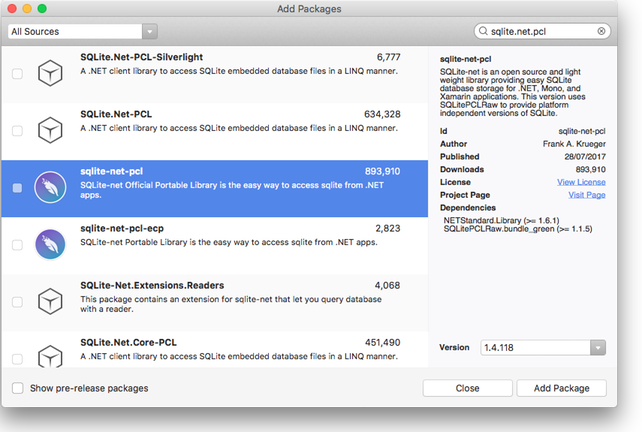
We’ve then a couple of packages that we’re going to add to the project: FreshMvvm and SQlite.Net.PCL.
For FreshMvvm the current version is: 2.2.4
While SQlite.Net.PCL is at version 1.4.118 (the package we’re looking for is the one by Frank A. Krueger)
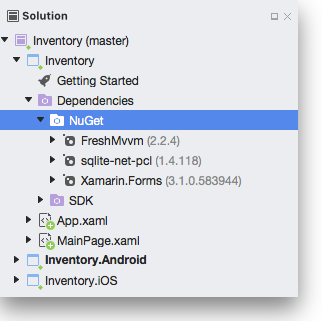
At the end, we’ve our three NuGet packages added to the project
Some cleanup of the project
#
The template generates for us a MainPage in the Inventory project that we don’t need, we can delete it and then start to work on our application.
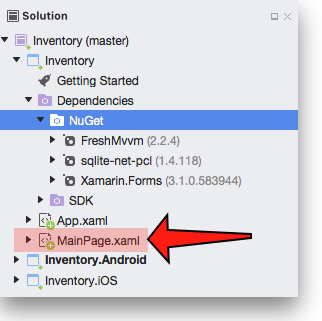
That moment when we talk about the goal of the application
#
This is a simple demo application where we want to keep track of items having a name, barcode and a quantity assigned to them. There’re going to be a couple of different screens, a list with all the items and a detailed view showing all the information of an item.
The data are going to be saved on the device in an SQLite database so that launching the application a second time we can find the data we entered previously.
There’s going to be some sort of barcode reading integration:
- Scanning a barcode of one of the items already in the database will recall it’s data.
- Scanning a barcode that is not in the database will create a new item.
Create Models Folder and “Item” class
#
It’s now time to start to build our application adding a model class for the items we want to do the inventory on.
We’re going to build the class so that it can be stored in a SQLite database, using the SQLite.net.pcl library.
First of all, create a Models folder inside the Inventory project.
Then we can create an Item class inside this folder, this will be our first model for the application:
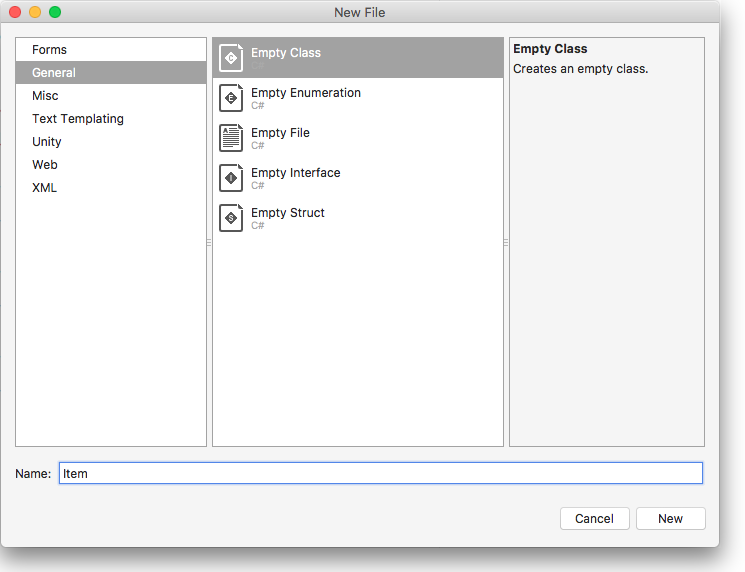
Here’s the code generated by the template:
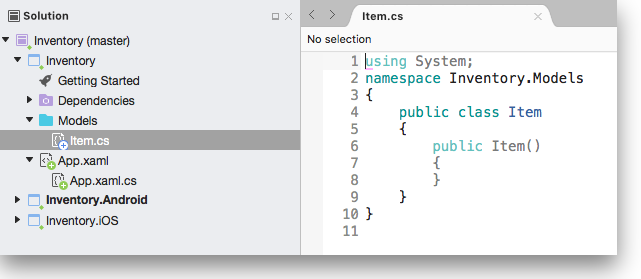
As we wrote initially, the class is created in the Inventory.Models namespace, we want to have all of our classes included in a project, in the same namespace. in this case in the Inventory namespace.
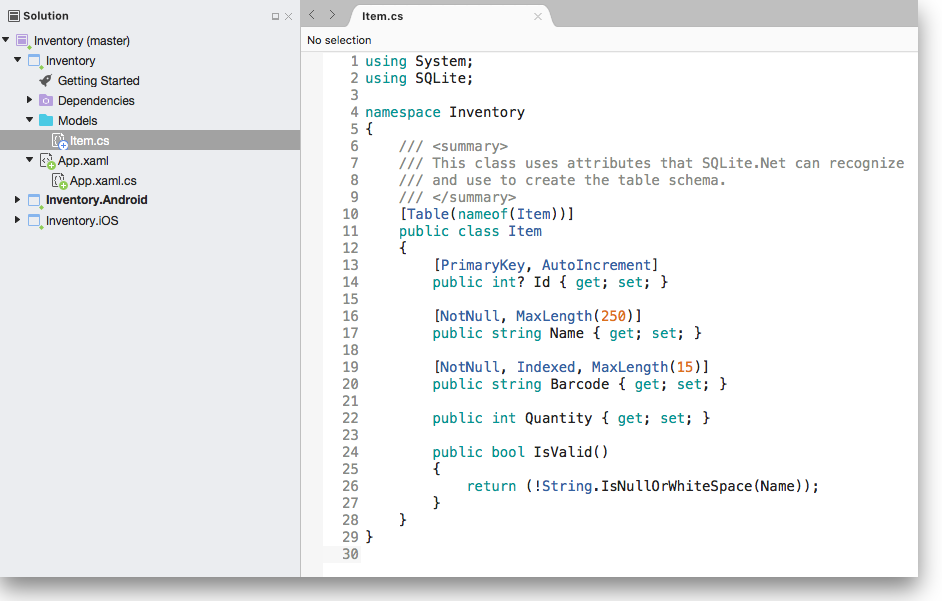
We can modify the code to become:
 1
 2
 3
 4
 5
 6
 7
 8
 9
10
11
12
13
14
15
16
17
18
19
20
21
22
23
24
25
26
27
28
29
| using System;
using SQLite;
namespace Inventory
{
/// <summary>
/// This class uses attributes that SQLite.Net can recognize
/// and use to create the table schema.
/// </summary>
[Table(nameof(Item))]
public class Item
{
[PrimaryKey, AutoIncrement]
public int? Id { get; set; }
[NotNull, MaxLength(250)]
public string Name { get; set; }
[NotNull, Indexed, MaxLength(15)]
public string Barcode { get; set; }
public int Quantity { get; set; }
public bool IsValid()
{
return (!String.IsNullOrWhiteSpace(Name));
}
}
}
|
The final result is:
Manage the database communication
#
Now that we’ve our Item model class, we need some code to setup the connection with the SQLite database that is going to keep its data.
For this we’re creating a repository class in the Inventory portable project that is going to provide the basic functionalities on the data:
- Handle DB connections
- Create items
- get all the items from the database
Create a Repository class in the portable project Inventory
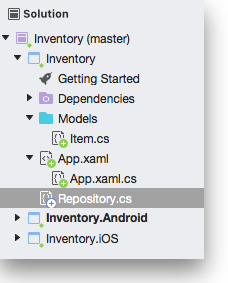
And then copy this code into the newly created file. As you can see we’re going to use async/await C# functionality to avoid to freeze the application when working on the database.
 1
 2
 3
 4
 5
 6
 7
 8
 9
10
11
12
13
14
15
16
17
18
19
20
21
22
23
24
25
26
27
28
29
30
31
32
33
34
35
36
37
38
39
40
41
42
43
44
| using System;
using System.Collections.Generic;
using System.Threading.Tasks;
using SQLite;
namespace Inventory
{
public class Repository
{
private readonly SQLiteAsyncConnection conn;
public string StatusMessage { get; set; }
public Repository(string dbPath)
{
conn = new SQLiteAsyncConnection(dbPath);
conn.CreateTableAsync<Item>().Wait();
}
public async Task CreateItem(Item item)
{
try
{
// Basic validation to ensure we have an item name.
if (string.IsNullOrWhiteSpace(item.Name))
throw new Exception("Name is required");
// Insert/update items.
var result = await conn.InsertOrReplaceAsync(item).ConfigureAwait(continueOnCapturedContext: false);
StatusMessage = $"{result} record(s) added [Item Name: {item.Name}])";
}
catch (Exception ex)
{
StatusMessage = $"Failed to create item: {item.Name}. Error: {ex.Message}";
}
}
public Task<List<Item>> GetAllItems()
{
// Return a list of items saved to the Item table in the database.
return conn.Table<Item>().ToListAsync();
}
}
}
|
The constructor of the Repository class accepts a string for the path of the database. This is going to be platform dependent, so we want to create a FileAccessHelper class for Android and one for iOS to customize the behaviour of the application for the two platforms.
Android database location
#
Create Android FileAccessHelper inside the Inventory.Droid project so that we return the path to a common repository for documents, as described on .NET documentation.
 1
 2
 3
 4
 5
 6
 7
 8
 9
10
11
12
13
14
| using System;
namespace Inventory.Droid
{
public class FileAccessHelper
{
public static string GetLocalFilePath(string filename)
{
// Use the SpecialFolder enum to get the Personal folder on the Android file system.
// Storing the database here is a best practice.
string path = System.Environment.GetFolderPath(System.Environment.SpecialFolder.Personal);
return System.IO.Path.Combine(path, filename);
}
}
}
|
iOS database location
#
In a similar way, we can create the FileAccessHelper class inside the Inventory.iOS project to retrieve the right path where we can create the SQLite database:
 1
 2
 3
 4
 5
 6
 7
 8
 9
10
11
12
13
14
15
16
17
18
19
20
21
22
| using System;
namespace Inventory.iOS
{
public class FileAccessHelper
{
public static string GetLocalFilePath(string filename)
{
// Use the SpecialFolder enum to get the Personal folder on the iOS file system.
// Then get or create the Library folder within this personal folder.
// Storing the database here is a best practice.
var docFolder = Environment.GetFolderPath(Environment.SpecialFolder.Personal);
var libFolder = System.IO.Path.Combine(docFolder, "..", "Library");
if (!System.IO.Directory.Exists(libFolder))
{
System.IO.Directory.CreateDirectory(libFolder);
}
return System.IO.Path.Combine(libFolder, filename);
}
}
}
|
Now we can create a repository instance on the Android and the iOS side using the FreshMvvm’s IoC Container functionality to inject the repository instance in the portable project.
Inject the repository instance on Android
#
Open the MainActivity.cs file in the Inventory.Droid and add to the OnCreate method, just before LoadApplication(new App()), to create the repository using the Android’s FileAccessHelper class:
1
2
| var repository = new Repository(FileAccessHelper.GetLocalFilePath("items.db3"));
FreshIOC.Container.Register(repository);
|
Adding the reference
Inject the repository instance on iOS
#
Open the AppDelegate.cs file in the Inventory.iOS and add to the FinishedLaunching method, just before LoadApplication(new App()), to create the repository using the iOS’s FileAccessHelper class:
1
2
| var repository = new Repository(FileAccessHelper.GetLocalFilePath("items.db3"));
FreshIOC.Container.Register(repository);
|
Adding the reference
This is enough at this moment for the platform-specific code, let’s get back to the portable project to finish up the first version of this application.
Views and ViewModels
#
Given that this application is using the MVVM pattern, it’s about time to start creating Views and ViewModels or, as more common in Xamarin Forms terminology, we’re starting to add Pages and PageModels.
So, let’s create a Pages and a PageModels folder in the Inventory portable project.
Item detail PageModel and Page
#
We want to create the page model and the actual xaml page for the Item detail page.
Inside the PageModels folder of the portable project create an ItemPageModel class and cut and paste this code to connect the Item model to its View:
 1
 2
 3
 4
 5
 6
 7
 8
 9
10
11
12
13
14
15
16
17
18
19
20
21
22
23
24
25
26
27
28
29
30
31
32
33
34
35
36
37
38
39
40
41
42
43
44
45
46
47
48
49
50
51
52
53
54
55
56
57
58
59
60
61
62
63
64
65
66
67
68
69
70
71
72
73
74
75
76
| using System;
using System.Windows.Input;
using FreshMvvm;
using Xamarin.Forms;
namespace Inventory
{
public class ItemPageModel : FreshBasePageModel
{
// Use IoC to get our repository.
private Repository _repository = FreshIOC.Container.Resolve<Repository>();
// Backing data model.
private Item _item;
/// <summary>
/// Public property exposing the item's name for Page binding.
/// </summary>
public string ItemName
{
get { return _item.Name; }
set { _item.Name = value; RaisePropertyChanged(); }
}
/// <summary>
/// Public property exposing the item's barcode for Page binding.
/// </summary>
public string ItemBarcode
{
get { return _item.Barcode; }
set { _item.Barcode = value; RaisePropertyChanged(); }
}
/// <summary>
/// Public property exposing the item's quantity for Page binding.
/// </summary>
public int ItemQuantity
{
get { return _item.Quantity; }
set { _item.Quantity = value; RaisePropertyChanged(); }
}
/// <summary>
/// Called whenever the page is navigated to.
/// Either use a supplied Item, or create a new one if not supplied.
/// FreshMVVM does not provide a RaiseAllPropertyChanged,
/// so we do this for each bound property, room for improvement.
/// </summary>
public override void Init(object initData)
{
_item = initData as Item;
if (_item == null) _item = new Item();
base.Init(initData);
RaisePropertyChanged(nameof(ItemName));
RaisePropertyChanged(nameof(ItemBarcode));
}
/// <summary>
/// Command associated with the save action.
/// Persists the item to the database if the item is valid.
/// </summary>
public ICommand SaveCommand
{
get
{
return new Command(async () => {
if (_item.IsValid())
{
await _repository.CreateItem(_item);
await CoreMethods.PopPageModel(_item);
}
});
}
}
}
}
|
Item detail Page
#
Inside the Pages folder, create an ItemPage XAML form
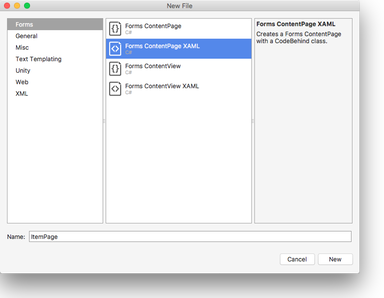
This wizard creates the ItemPage.xaml file, plus the code-behind file ItemPage.xaml.cs.
ItemPage.xaml
#
 1
 2
 3
 4
 5
 6
 7
 8
 9
10
11
12
13
14
15
| <?xml version="1.0" encoding="utf-8"?>
<!-- Add the xmlns:fresh line and use it to resolve the fresh:FreshBaseContentPage declaration -->
<fresh:FreshBaseContentPage xmlns="http://xamarin.com/schemas/2014/forms" xmlns:x="http://schemas.microsoft.com/winfx/2009/xaml" x:Class="Inventory.ItemPage" xmlns:fresh="clr-namespace:FreshMvvm;assembly=Inventory">
<ContentPage.Content>
<StackLayout Padding="15" Spacing="5">
<Label Text="Item Name" />
<Entry Text="{Binding ItemName}" />
<Label Text="Item Barcode" />
<Entry Text="{Binding ItemBarcode}" />
<Label Text="Item Quantity" />
<Entry Text="{Binding ItemQuantity}" />
<Button Text="Save" Command="{Binding SaveCommand}" />
</StackLayout>
</ContentPage.Content>
</fresh:FreshBaseContentPage>
|
ItemPage.xaml.cs
#
The code behind is just initializing the page using the xaml definition:
 1
 2
 3
 4
 5
 6
 7
 8
 9
10
11
12
| using FreshMvvm;
namespace Inventory
{
public partial class ItemPage : FreshBaseContentPage
{
public ItemPage()
{
InitializeComponent();
}
}
}
|
Item list PageModel and Page
#
Inside the PageModels folder of the portable project create an ItemListPageModel class and cut and paste this code to connect it to the Repository class:
  1
  2
  3
  4
  5
  6
  7
  8
  9
 10
 11
 12
 13
 14
 15
 16
 17
 18
 19
 20
 21
 22
 23
 24
 25
 26
 27
 28
 29
 30
 31
 32
 33
 34
 35
 36
 37
 38
 39
 40
 41
 42
 43
 44
 45
 46
 47
 48
 49
 50
 51
 52
 53
 54
 55
 56
 57
 58
 59
 60
 61
 62
 63
 64
 65
 66
 67
 68
 69
 70
 71
 72
 73
 74
 75
 76
 77
 78
 79
 80
 81
 82
 83
 84
 85
 86
 87
 88
 89
 90
 91
 92
 93
 94
 95
 96
 97
 98
 99
100
101
102
103
104
105
106
107
108
109
110
111
112
113
114
115
116
117
118
119
120
121
122
123
124
125
126
127
128
129
130
131
132
133
134
135
136
137
138
139
140
141
142
143
144
145
| using FreshMvvm;
using System.Collections.Generic;
using System.Collections.ObjectModel;
using System.Linq;
using System.Threading.Tasks;
using System.Windows.Input;
using Xamarin.Forms;
namespace Inventory
{
public class ItemListPageModel : FreshBasePageModel
{
private Repository _repository = FreshIOC.Container.Resolve<Repository>();
private Item _selectedItem = null;
/// <summary>
/// Collection used for binding to the Page's item list view.
/// </summary>
public ObservableCollection<Item> Items { get; private set; }
/// <summary>
/// Used to bind with the list view's SelectedItem property.
/// Calls the EditItemCommand to start the editing.
/// </summary>
public Item SelectedItem
{
get { return _selectedItem; }
set
{
_selectedItem = value;
if (value != null) EditItemCommand.Execute(value);
}
}
public ItemListPageModel()
{
Items = new ObservableCollection<Item>();
}
/// <summary>
/// Called whenever the page is navigated to.
/// Here we are ignoring the init data and just loading the items.
/// </summary>
public override void Init(object initData)
{
LoadItems();
if (Items.Count() < 1)
{
CreateSampleData();
}
}
/// <summary>
/// Called whenever the page is navigated to, but from a pop action.
/// Here we are just updating the item list with most recent data.
/// </summary>
/// <param name="returnedData"></param>
public override void ReverseInit(object returnedData)
{
LoadItems();
base.ReverseInit(returnedData);
}
/// <summary>
/// Command associated with the add item action.
/// Navigates to the ItemPageModel with no Init object.
/// </summary>
public ICommand AddItemCommand
{
get
{
return new Command(async () => {
await CoreMethods.PushPageModel<ItemPageModel>();
});
}
}
/// <summary>
/// Command associated with the edit item action.
/// Navigates to the ItemPageModel with the selected item as the Init object.
/// </summary>
public ICommand EditItemCommand
{
get
{
return new Command(async (item) => {
await CoreMethods.PushPageModel<ItemPageModel>(item);
});
}
}
/// <summary>
/// Repopulate the collection with updated items data.
/// Note: For simplicity, we wait for the async db call to complete,
/// recommend making better use of the async potential.
/// </summary>
private void LoadItems()
{
Items.Clear();
Task<List<Item>> getItemTask = _repository.GetAllItems();
getItemTask.Wait();
foreach (var item in getItemTask.Result)
{
Items.Add(item);
}
}
/// <summary>
/// Uses the SQLite Async capability to insert sample data on multiple threads.
/// </summary>
private void CreateSampleData()
{
var item1 = new Item
{
Name = "Milk",
Barcode = "8001234567890",
Quantity = 10
};
var item2 = new Item
{
Name = "Soup",
Barcode = "8002345678901",
Quantity = 5
};
var item3 = new Item
{
Name = "Water",
Barcode = "8003456789012",
Quantity = 20
};
var task1 = _repository.CreateItem(item1);
var task2 = _repository.CreateItem(item2);
var task3 = _repository.CreateItem(item3);
// Don't proceed until all the async inserts are complete.
var allTasks = Task.WhenAll(task1, task2, task3);
allTasks.Wait();
LoadItems();
}
}
}
|
Item List Page
#
Inside the Pages folder, create an ItemListPage XAML form.
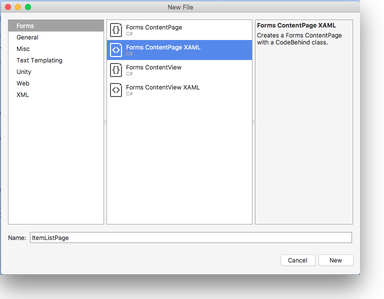
This wizard creates the ItemListPage.xaml file, plus the code-behind file ItemListPage.xaml.cs.
ItemListPage.xaml
#
The xaml code that we’re using here is going to add a toolbar with an Add action, linked to the AddItemCommand that we can find in the Item List PageModel. The data are then shown using a listview with the data coming from the Items collection in the Item List PageModel:
 1
 2
 3
 4
 5
 6
 7
 8
 9
10
11
12
13
14
15
16
17
| <?xml version="1.0" encoding="utf-8" ?>
<!-- Add the xmlns:fresh line and use it to resolve the fresh:FreshBaseContentPage declaration -->
<fresh:FreshBaseContentPage xmlns="http://xamarin.com/schemas/2014/forms"
xmlns:x="http://schemas.microsoft.com/winfx/2009/xaml"
x:Class="Inventory.ItemListPage"
xmlns:fresh="clr-namespace:FreshMvvm;assembly=Inventory">
<fresh:FreshBaseContentPage.ToolbarItems>
<ToolbarItem Text="Add" Command="{Binding AddItemCommand}" />
</fresh:FreshBaseContentPage.ToolbarItems>
<ListView ItemsSource="{Binding Items}" SelectedItem="{Binding SelectedItem}">
<ListView.ItemTemplate >
<DataTemplate>
<TextCell Text="{Binding Name}" Detail="{Binding Quantity}" />
</DataTemplate>
</ListView.ItemTemplate>
</ListView>
</fresh:FreshBaseContentPage>
|
ItemListPage.xaml.cs
#
The code behind is just initializing the page using the xaml definition:
 1
 2
 3
 4
 5
 6
 7
 8
 9
10
11
12
13
14
15
| using System;
using System.Collections.Generic;
using FreshMvvm;
using Xamarin.Forms;
namespace Inventory
{
public partial class ItemListPage : FreshBaseContentPage
{
public ItemListPage()
{
InitializeComponent();
}
}
}
|
Connecting the Pages to the application
#
We’ve now to connect the initial page (ItemList) with the application. We can do this adding this code to the App.xaml.cs constructor, after InitializeComponent()
1
2
3
| var page = FreshPageModelResolver.ResolvePageModel<ItemListPageModel>();
var navContainer = new FreshNavigationContainer(page);
MainPage = navContainer;
|
adding the reference:
The complete file became:
1
2
3
4
5
6
7
8
9
10
11
12
13
14
15
16
17
18
19
20
21
22
23
24
25
26
27
28
29
30
31
32
33
34
35
| using System;
using FreshMvvm;
using Xamarin.Forms;
using Xamarin.Forms.Xaml;
[assembly: XamlCompilation(XamlCompilationOptions.Compile)]
namespace Inventory
{
public partial class App : Application
{
public App()
{
InitializeComponent();
var page = FreshPageModelResolver.ResolvePageModel<ItemListPageModel>();
var navContainer = new FreshNavigationContainer(page);
MainPage = navContainer;
}
protected override void OnStart()
{
// Handle when your app starts
}
protected override void OnSleep()
{
// Handle when your app sleeps
}
protected override void OnResume()
{
// Handle when your app resumes
}
}
}
|
These are all the files we expect to have in the portable project:
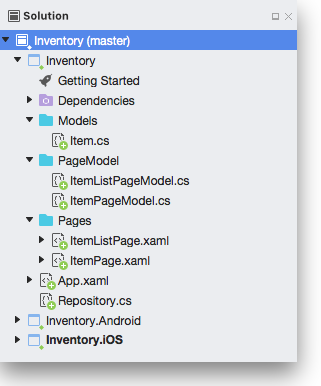
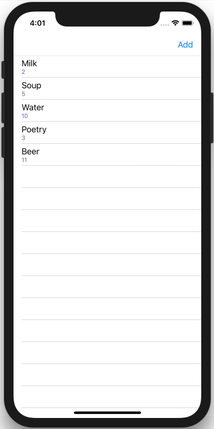
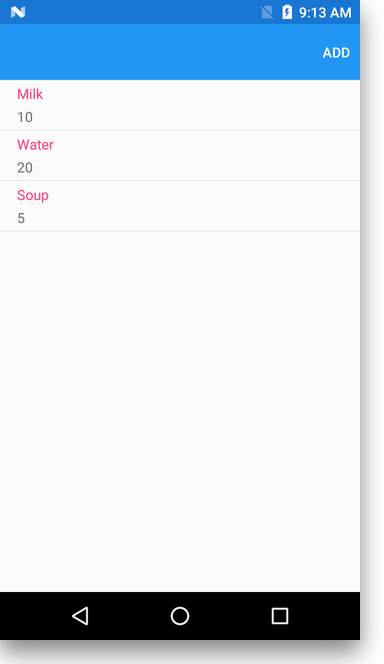
we can now run the iOS or the Android project to verify that the application works correctly:
In the next post we’re going to see how we can integrate DataWedge’s Intent API taking advantage of FreshMVVM IoC functionalities.


