Note: the accompanying code is available on GitHub.
The topic for today is how to add barcode scanning functionalities to the “Inventory” sample application we built in the previous post about Xamarin.Forms and FreshMVVM.
To integrate barcode scanning functionalities we’ve different options:
- Do Nothing - Barcode scanning in enabled by default simulating keyboard entry: the application receives the data in the selected input field.
- Integrate Barcode scanning API from Zebra’s EMDK for Xamarin - This is time consuming and add a dependency to our project. We can see this as an option for applications that want to have the maximum control on the Barcode scanning capabilities of Zebra devices.
- Use DataWedge Intent APIs - This allows to have a very good control of the barcode scanning functionality using standard Android interfaces (Intents, in this case), without the need to add any additional dependency to the project.
For this project we’re going to adopt the third option, that I believe is the best one for most of the data-entry applications that are going to run on Android powered Zebra devices.
DataWedge integration
#
DataWedge (DW for the rest of this article) on Zebra’s Android devices shares only its name with the application running on legacy Windows Zebra’s devices. DW on Android is a service that is always available to application to scan barcodes and send the data to the foreground application through different channels. Over time DW expanded its programmatic-ability adding functionalities to its Intent APIs.
You can read an excellent introduction to DataWedge and its APIs in this blog post by Darryn Campbell.
The basic concept for DW is that it’s profile driven, and you can specify which profile needs to be active when a particular application/activity is in the foreground. This allows to have a very fine grained control of the barcode scanning capability out of the box, without having to delve in any API. But, if you need more functionalities, the features are there, and easy addition to your application through an Android Intent!
Configuring DataWedge
#
DataWedge can be configured in different ways:
- Manually - Through it’s user interface on the device as explained in DW’s documentation.
- Programmatically - Through the DataCapture profile API in the Zebra’s EMDK for Xamarin (but this method has been deprecated in the last EMDK for Xamarin version).
- Programmatically using Intents - Through the DW Intent APIs.
- From configuration files - You can export a configuration from one device and copy the file on other devices inside the
/enterprise/device/settings/datawedge/autoimport. This is explained in DW’s documentation.
Given that we want to integrate DW using its Intent APIs, we’re going to use the third method to create a DW profile for our application.
Create a DataWedge profile
#
The easiest way to do this, is to send the intent when the Activity of our Xamarin Forms application is created, as explained in Darryn’s blog, we can use the CreateProfile Intent to create the initial profile and then set the parameters, input and output, using the SetProfile Intent command:
 1
 2
 3
 4
 5
 6
 7
 8
 9
10
11
12
13
14
15
16
17
18
19
20
21
22
23
24
25
26
27
28
29
30
31
32
33
34
35
| private void CreateProfile()
{
String profileName = EXTRA_PROFILE_NAME;
SendDataWedgeIntentWithExtra(ACTION_DATAWEDGE_FROM_6_2, EXTRA_CREATE_PROFILE, profileName);
// Now configure that created profile to apply to our application
Bundle profileConfig = new Bundle();
profileConfig.PutString("PROFILE_NAME", EXTRA_PROFILE_NAME);
profileConfig.PutString("PROFILE_ENABLED", "true"); // Seems these are all strings
profileConfig.PutString("CONFIG_MODE", "UPDATE");
Bundle barcodeConfig = new Bundle();
barcodeConfig.PutString("PLUGIN_NAME", "BARCODE");
barcodeConfig.PutString("RESET_CONFIG", "true"); // This is the default but never hurts to specify
Bundle barcodeProps = new Bundle();
barcodeConfig.PutBundle("PARAM_LIST", barcodeProps);
profileConfig.PutBundle("PLUGIN_CONFIG", barcodeConfig);
Bundle appConfig = new Bundle();
appConfig.PutString("PACKAGE_NAME", this.PackageName); // Associate the profile with this app
appConfig.PutStringArray("ACTIVITY_LIST", new String[] { "*" });
profileConfig.PutParcelableArray("APP_LIST", new Bundle[] { appConfig });
SendDataWedgeIntentWithExtra(ACTION_DATAWEDGE_FROM_6_2, EXTRA_SET_CONFIG, profileConfig);
// You can only configure one plugin at a time, we have done the barcode input, now do the intent output
profileConfig.Remove("PLUGIN_CONFIG");
Bundle intentConfig = new Bundle();
intentConfig.PutString("PLUGIN_NAME", "INTENT");
intentConfig.PutString("RESET_CONFIG", "true");
Bundle intentProps = new Bundle();
intentProps.PutString("intent_output_enabled", "true");
// intentProps.PutString("intent_action", DataWedgeReceiver.IntentAction); // We can use this when we're going to define the DataWedgeReceiver class
intentProps.PutString("intent_action", "barcodescanner.RECVR");
intentProps.PutString("intent_delivery", "2");
intentConfig.PutBundle("PARAM_LIST", intentProps);
profileConfig.PutBundle("PLUGIN_CONFIG", intentConfig);
SendDataWedgeIntentWithExtra(ACTION_DATAWEDGE_FROM_6_2, EXTRA_SET_CONFIG, profileConfig);
}
|
Where the SendDataWedgeIntentWithExtra is implemented as:
 1
 2
 3
 4
 5
 6
 7
 8
 9
10
11
12
13
14
15
| private void SendDataWedgeIntentWithExtra(String action, String extraKey, Bundle extras)
{
Intent dwIntent = new Intent();
dwIntent.SetAction(action);
dwIntent.PutExtra(extraKey, extras);
SendBroadcast(dwIntent);
}
private void SendDataWedgeIntentWithExtra(String action, String extraKey, String extraValue)
{
Intent dwIntent = new Intent();
dwIntent.SetAction(action);
dwIntent.PutExtra(extraKey, extraValue);
SendBroadcast(dwIntent);
}
|
Now we just need to define a couple of constants in the MainActivity class and we can call the CreateProfile method from the OnCreate callback:
 1
 2
 3
 4
 5
 6
 7
 8
 9
10
11
12
13
14
15
16
17
18
19
20
21
| private static string ACTION_DATAWEDGE_FROM_6_2 = "com.symbol.datawedge.api.ACTION";
private static string EXTRA_CREATE_PROFILE = "com.symbol.datawedge.api.CREATE_PROFILE";
private static string EXTRA_SET_CONFIG = "com.symbol.datawedge.api.SET_CONFIG";
private static string EXTRA_PROFILE_NAME = "Inventory DEMO";
protected override void OnCreate(Bundle bundle)
{
TabLayoutResource = Resource.Layout.Tabbar;
ToolbarResource = Resource.Layout.Toolbar;
base.OnCreate(bundle);
global::Xamarin.Forms.Forms.Init(this, bundle);
var repository = new Repository(FileAccessHelper.GetLocalFilePath("items.db3"));
FreshIOC.Container.Register(repository);
CreateProfile();
LoadApplication(new App());
}
|
Let’s try to run this application on a Zebra device and see if the profile it’s created.
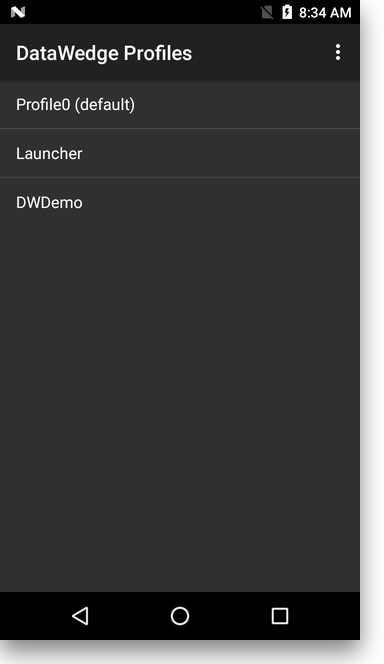
This is the initial situation inside DataWedge:

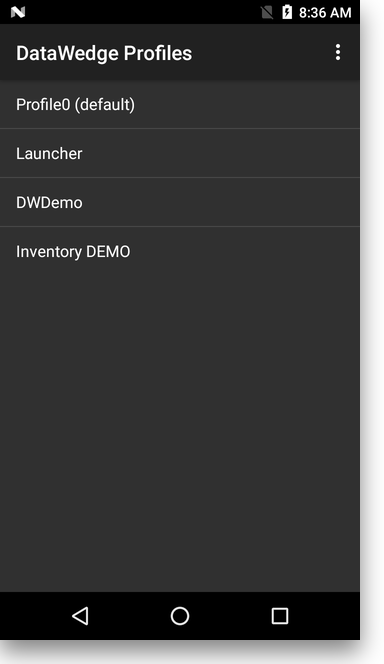
After we run the application, we can see that there’s now a profile with the name Inventory DEMO:

This is the name we have chosen in our application:
1
| private static string EXTRA_PROFILE_NAME = "Inventory DEMO";
|
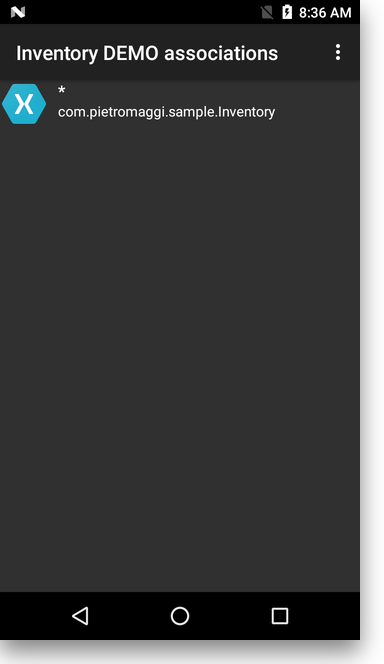
If we look into this profile, we can see that it’s associated with our application:

This is because we have set the Package name to this.PackageName:
1
2
| appConfig.PutString("PACKAGE_NAME", this.PackageName); // Associate the profile with this app
appConfig.PutStringArray("ACTIVITY_LIST", new String[] { "*" });
|
Handling the data coming from DataWedge
#
So far we’ve created the DW’s profile so that we’re going to receive the barcode data as a broadcast intent.
What we want to implement is that, when we receive the barcode data, we’re going to search for it in the database and open the detail view with the data we’ve retrieved from the database. If the barcode we’ve just scanned is not in the database, we’ll create a new record and show the ItemPage as well.
GetItem from database
#
So, the first step is to add to modify the Repository.cs to search for a Barcode creating a GetItem method that, given the barcode string, retrieve an Item from the database:
1
2
3
4
| public Task<List<Item>> GetItem(string barcode)
{
return conn.QueryAsync<Item>("select * from Item where barcode=?", barcode);
}
|
Handle barcode scanning message (ItemListPageModel)
#
We’re now going to implement inside the ItemListPageModel class the method that receive the scanned barcode, search for the item in the database, create a new Item if the barcode is not already in the database, and then open the ItemPage for this Item:
 1
 2
 3
 4
 5
 6
 7
 8
 9
10
11
12
13
14
15
16
| private void ScanBarcode(string barcode)
{
Item item;
Task<List<Item>> getItemTask = _repository.GetItem(barcode);
getItemTask.Wait();
if (getItemTask.Result.Count() < 1)
{
item = new Item{Name = "", Barcode = barcode};
} else {
item = getItemTask.Result.First<Item>();
}
CoreMethods.PushPageModel<ItemPageModel>(item);
}
|
Receiving the barcode message
#
To receive the barcode in the Inventory application, we’re going to use Xamarin Forms’ MessagingCenter. This is a very low friction solution that can easily implemented in our ItemListPageModel class, in the init method:
 1
 2
 3
 4
 5
 6
 7
 8
 9
10
11
12
| public override void Init(object initData)
{
LoadItems();
if (Items.Count() < 1)
{
CreateSampleData();
}
MessagingCenter.Subscribe<App, string>(this, "ScanBarcode", (sender, arg) => {
ScanBarcode(arg);
});
}
|
We just need something that send this message!
Receiving data from DataWedge
#
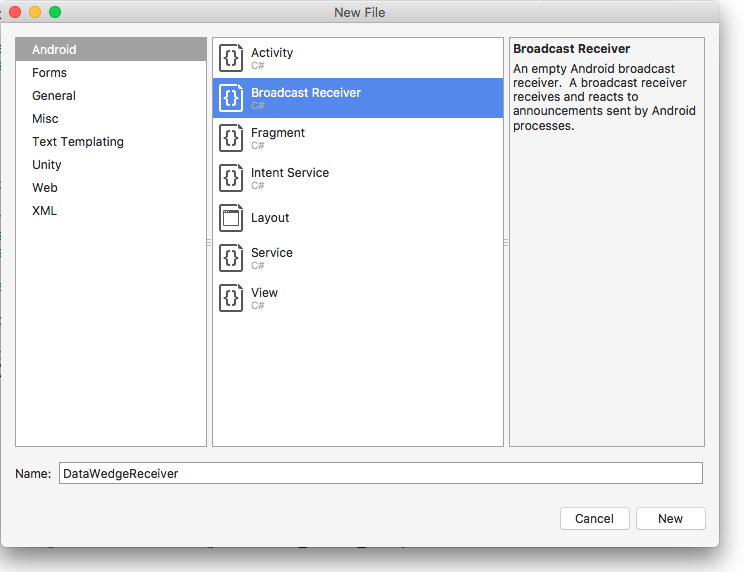
The DataWedge profile that we’re creating with the code we have introduced earlier is sending the data with a broadcast intent using the action DataWedgeReceiver.IntentAction. As you may have already guess, we need to create a broadcast receiver in the Inventory.Droid project using the Broadcast Receiver template and call it DataWedgeReceiver:

Broadcast receiver
#
The initial implementation of the broadcast receiver is to handle the data sent from DataWedge and send the data to the registered event handler:
 1
 2
 3
 4
 5
 6
 7
 8
 9
10
11
12
13
14
15
16
17
18
19
20
21
22
23
24
25
26
27
28
29
30
31
32
33
34
35
36
37
38
39
40
41
42
43
44
45
46
47
48
49
50
51
52
53
54
55
56
57
58
59
60
61
62
63
64
65
66
67
68
69
70
71
72
73
74
| using System;
using Android.Content;
namespace Inventory.Droid
{
[BroadcastReceiver]
public class DataWedgeReceiver : BroadcastReceiver
{
// This intent string contains the source of the data as a string
private static string SOURCE_TAG = "com.motorolasolutions.emdk.datawedge.source";
// This intent string contains the barcode symbology as a string
private static string LABEL_TYPE_TAG = "com.motorolasolutions.emdk.datawedge.label_type";
// This intent string contains the captured data as a string
// (in the case of MSR this data string contains a concatenation of the track data)
private static string DATA_STRING_TAG = "com.motorolasolutions.emdk.datawedge.data_string";
// Intent Action for our operation
public static string IntentAction = "barcodescanner.RECVR";
public static string IntentCategory = "android.intent.category.DEFAULT";
public event EventHandler<String> scanDataReceived;
public override void OnReceive(Context context, Intent i)
{
// check the intent action is for us
if (i.Action.Equals(IntentAction))
{
// define a string that will hold our output
String Out = "";
// get the source of the data
String source = i.GetStringExtra(SOURCE_TAG);
// save it to use later
if (source == null)
source = "scanner";
// get the data from the intent
String data = i.GetStringExtra(DATA_STRING_TAG);
// let's define a variable for the data length
int data_len = 0;
// and set it to the length of the data
if (data != null)
data_len = data.Length;
// check if the data has come from the barcode scanner
if (source.Equals("scanner"))
{
// check if there is anything in the data
if (data != null && data.Length > 0)
{
// we have some data, so let's get it's symbology
String sLabelType = i.GetStringExtra(LABEL_TYPE_TAG);
// check if the string is empty
if (sLabelType != null && sLabelType.Length > 0)
{
// format of the label type string is LABEL-TYPE-SYMBOLOGY
// so let's skip the LABEL-TYPE- portion to get just the symbology
sLabelType = sLabelType.Substring(11);
}
else
{
// the string was empty so let's set it to "Unknown"
sLabelType = "Unknown";
}
// let's construct the beginning of our output string
Out = data.ToString() + "\r\n";
}
}
if (scanDataReceived != null)
{
scanDataReceived(this, Out);
}
}
}
}
}
|
Register the broadcast receiver
#
Now we’ve most of the pieces together, what we still miss is to create a DataWedgeReceiver instance setting the event to send the correct message that is expected in the ItemListPageModel class:
1
2
3
4
5
6
7
| _broadcastReceiver = new DataWedgeReceiver();
App inventoryApp = new App();
_broadcastReceiver.scanDataReceived += (s, scanData) =>
{
MessagingCenter.Send<App, string>(inventoryApp, "ScanBarcode", scanData);
};
|
Then we can handle the registration of the broadcast receiver in the OnResume and OnPause callback handler, so that the receiver is only active when the application has the focus:
 1
 2
 3
 4
 5
 6
 7
 8
 9
10
11
12
13
14
15
16
17
18
19
20
21
22
| protected override void OnResume()
{
base.OnResume();
if (null != _broadcastReceiver)
{
// Register the broadcast receiver
IntentFilter filter = new IntentFilter(DataWedgeReceiver.IntentAction);
filter.AddCategory(DataWedgeReceiver.IntentCategory);
Android.App.Application.Context.RegisterReceiver(_broadcastReceiver, filter);
}
}
protected override void OnPause()
{
if (null != _broadcastReceiver)
{
// Unregister the broadcast receiver
Android.App.Application.Context.UnregisterReceiver(_broadcastReceiver);
}
base.OnStop();
}
|
We can now compile the application and test the barcode scanning integration on a Zebra’s Android device.
As a plus, the application can still be compiled and used for other Android devices or for iOS without any issue, simply the barcode scanning functionalities are only available on Zebra devices.
The full source code is available on the github project. This version is saved with the tag datawedge.
In the next post we’re going to refactor the code with the goal to make it a bit more modular adding some flexibility on how we manage the barcode.
Edit
#
I’ve modified the initial code to create the profile to avoid the reference to the DataWedgeReceiver that is not yet available at that moment.


