What if…
you want to use a Zebra’s Android device mounted on an arm-mount and you want to control the barcode scanner with a wired button?
WT6000 is the obvious answer!
But if your customer has already chosen the TC51 for other activities, we can help them using the headset connector.
The Android headset connectors
#
Before Apple decided that we don’t need anymore the 3.5mm headset connector on our phones, people started to look into it as a standard input interface for all the devices.
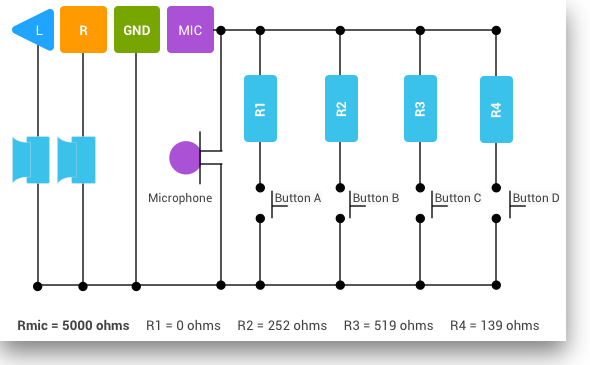
Android, being more open than its alternatives, published all the specification of this interface, explaining what can be done with it:
Android Headset documentation

Here we’re looking how we can intercept the Button_A in our application so that we can use it as a barcode trigger.
Looking through some other documentation on the Android website we can see that the Android KeyCode we need to intercept is the KEYCODE_MEDIA_PLAY_PAUSE.
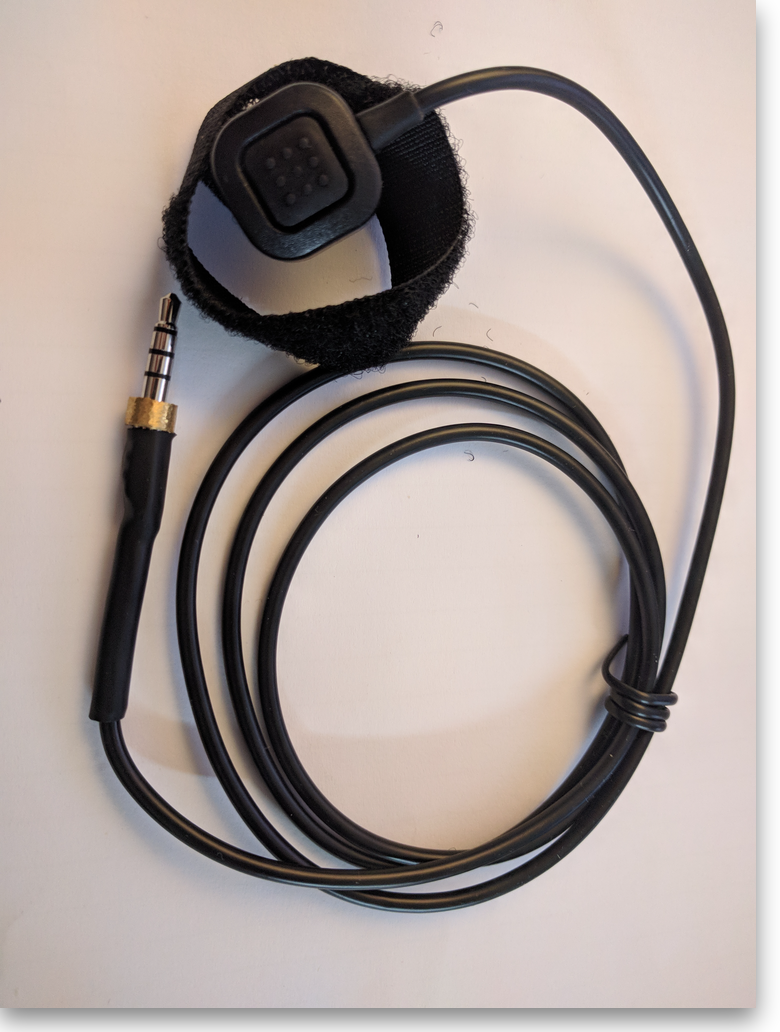
About the hardware, there’re online some alternatives but we ended up building our own prototype:

Enterprise Browser’s KeyCapture API
#
As we wrote at the beginning, this particular customer was using a web application, so we decided to use Zebra’s Enterprise Browser to integrate this headset based trigger with the existing web application.
Given that we’ve seen that the headset keys generate an Android KeyCode we can use EB’s KeyCapture API to intercept them.
Building a POC demo with Enterprise Browser’s KeyCapture API
#
First of all, we need to understand which KeyCode we get in EB to be able to intercept it. [As I wrote in a past post]({{ relref . “android_backbutton_and_eb.md” }}) we can use a very simple page to discover the right value we need.
Just create a new index.html file with the following content, and copy it to your device.
 1
 2
 3
 4
 5
 6
 7
 8
 9
10
11
| <!DOCTYPE html>
<html lang="en">
<META HTTP-Equiv="KeyCapture" Content="KeyValue:All; Dispatch:False; KeyEvent:url('JavaScript:console.log('Key Pressed: %s');')">
<head>
<meta charset="utf-8">
<title>Display KeyCode</title>
</head>
<body>
<H1>Press a key to see it's KeyCode</H1>
</body>
</html>
|
We can then look into EB’s logs or use Chrome’s DevTools to see what our code is logging.
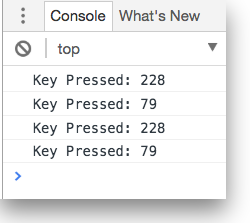
In my case, testing this on a TC56 running Android v7.1 Nougat. I get two different KeyCode: 228 and 79. We want both!

We can now build our PoC application, starting from the index.html page:
 1
 2
 3
 4
 5
 6
 7
 8
 9
10
11
12
13
14
15
16
17
18
19
20
21
22
23
24
25
26
| <!DOCTYPE html>
<html lang="en">
<head>
<meta charset="utf-8" />
<title>Barcode scanning test</title>
<link rel="stylesheet" href="style.css" />
</head>
<body>
<h1>Barcode scanning test</h1>
<input type="checkbox" id="scanner"/>
<label for="scanner" class="button" id="scannerLabel">Scanner Disabled</label>
<div id="barcode">
Barcode Data: <br>
Time:
</div>
<br>
<button class="quit">Exit</button>
<input type="text" value="type here">
<footer></footer>
<script src="ebapi-modules.js"></script>
<script src="app.js"></script>
</body>
</html>
|
style.css: 1
2
3
4
5
6
7
8
9
10
11
12
13
14
15
16
17
18
19
20
21
22
23
24
25
26
27
28
29
30
31
32
33
34
35
36
37
38
39
40
41
42
43
44
45
46
47
48
49
50
| * {
padding: 0;
margin: 0;
}
body {
text-align: center;
font-family: sans-serif;
}
h1 {
margin: .5em 0 1em;
}
#barcode {
margin: 1em auto 1em;
border-spacing: 0;
border-collapse: collapse;
}
button, .button {
padding: .8em 1.2em;
border: 1px solid rgba(0, 0, 0, .2);
border-radius: .3em;
box-shadow: 0 1px 0 hsla(0, 0%, 100%, .7) inset, 0 .15em .1em -.1em rgba(0, 0, 0, .3);
background: linear-gradient(hsla(0, 0%, 100%, .3), hsla(0, 0%, 100%, 0)) hsl(80, 80%, 35%);
color: white;
text-shadow: 0 -.05em .05em rgba(0, 0, 0, .3);
font: inherit;
font-weight: bold;
outline: none;
cursor: pointer;
}
button:enabled:active,
.button:active,
input[type="checkbox"]:checked + label.button {
background-image: none;
box-shadow: 0 .1em .3em rgba(0, 0, 0, .5) inset;
}
button:disabled {
background-color: hsl(80, 20%, 40%);
cursor: not-allowed;
}
#scanner {
position: absolute;
clip: rect(0, 0, 0, 0);
}
|
app.js file: 1
2
3
4
5
6
7
8
9
10
11
12
13
14
15
16
17
18
19
20
21
22
23
24
25
26
27
28
29
30
31
32
33
34
35
36
37
38
39
40
41
42
43
| function $$(selector, container) {
return (container || document).querySelector(selector);
}
function fnScanReceived(params) {
if (params['data'] == "" || params['time'] == "") {
$$('#barcode').innerHTML = "Failed!";
return;
}
var displayStr = "Barcode Data: " + params['data'] + "<br>Time: " + params['time'];
$$("#barcode").innerHTML = displayStr + "<br>" + JSON.stringify(params);;
}
function keyCallback(params) {
console.log("this key has just been pressed!: " + params['keyValue']);
if (79 === params.keyValue) {
EB.Barcode.start();
}
}
(function() {
var buttons = {
quit: $$('button.quit'),
};
buttons.quit.addEventListener('click', function() {
EB.Application.quit();
});
EB.KeyCapture.captureKey(false, "228", keyCallback);
EB.KeyCapture.captureKey(false, "79", keyCallback);
$$('#scanner').addEventListener('change', function() {
if (this.checked) {
EB.Barcode.enable({ allDecoders: true }, fnScanReceived);
$$('#scannerLabel').innerHTML = "Scanner Enabled";
} else {
EB.Barcode.disable();
$$('#scannerLabel').innerHTML = "Scanner Disabled";
}
});
})();
|
/sdcard/www/ folder.In EB’s Config.xml I then use:
1
2
3
4
5
6
7
8
9
10
11
| <WebServer>
<Enabled VALUE="1"/>
<Port VALUE="8082"/>
<WebFolder VALUE="%PRIMARYDIR%/www/"/>
<Public VALUE="0"/>
</WebServer>
<General>
<Name value="HeadsetPoC"/>
<StartPage value="http://0.0.0.0:8082/demo1/index.html" name="HeadsetPoC"/>
</General>
|
1
2
3
| <DebugSetting>
<DebugModeEnable value="1"/>
</DebugSetting>
|
Working on an existing web application
#
As we wrote at the beginning, this customer wanted to have this headset trigger to work with an existing web application. Once we built the PoC and we knew that it was possible to use the headset connection as a barcode trigger we used EB’s DOM Injection functionality to add these capabilities to the existing application.
This customization is really dependent on the existing application, what I can write here, is that you need to add to EB’s Config.xml a CustomDOMElements element:
1
| <CustomDOMElements value="file://%INSTALLDIR%/mytags.txt"/>
|
mytags.txt file in the same folder of the Config.xml file, usually /sdcard/Android/data/com.symbol.enterprisebrowser/, and we inject a single JavaScript in every page:1
2
3
4
5
6
7
8
| <!--Sample tags file -->
<!--FILENAME: 'mytags.txt' -->
<!--DESC: 'tags' file for DOM Injection -->
<!--JavaScript section-->
<!--inject keycapture.js into all pages-->
<script type='text/javascript' src='file:///storage/emulated/0/Android/data/com.symbol.enterprisebrowser/keycapture.js' pages='*'/>
|
keycapture.js file is: 1
2
3
4
5
6
7
8
9
10
11
12
13
14
15
16
17
| console.log('KeyCapture Configured');
EB.KeyCapture.captureKey(false, "228", keyCallback);
EB.KeyCapture.captureKey(false, "79", keyCallback);
function keyCallback(params) {
console.log("this key has just been pressed!: " + params['keyValue']);
if (79 === params.keyValue) {
i = {
'intentType': 'broadcast',
'action': 'com.symbol.datawedge.api.ACTION_SOFTSCANTRIGGER',
'data': {
'com.symbol.datawedge.api.EXTRA_PARAMETER': 'START_SCANNING',
}
};
EB.Intent.send(i);
}
}
|
There’re some additional steps to be able to do this that you can find on EB’s documentation website and in this useful blog post on Zebra’s developer portal.
This is all for Enterprise Browser. I hope you enjoy this incredible tool!
One more thing
#
If your customer want to use the same setup with a native application, one option is to have a small Android service that works with the Android media service to capture this particular event.
A very simple implementation of such a service could be:
 1
 2
 3
 4
 5
 6
 7
 8
 9
10
11
12
13
14
15
16
17
18
19
20
21
22
23
24
25
26
27
28
29
30
31
32
33
34
35
36
37
38
39
40
41
42
43
44
45
46
47
48
49
50
51
52
53
54
55
56
57
58
59
60
61
62
63
64
65
66
67
68
69
70
71
72
73
74
75
76
77
78
79
80
81
| import android.app.Service;
import android.content.Intent;
import android.os.IBinder;
import android.support.annotation.Nullable;
import android.support.v4.media.session.MediaButtonReceiver;
import android.support.v4.media.session.MediaSessionCompat;
import android.util.Log;
import android.widget.Toast;
public class myService extends Service {
@Nullable
// DataWedge SoftTrigger intent's parameters
String softScanTrigger = "com.symbol.datawedge.api.ACTION_SOFTSCANTRIGGER";
String extraData = "com.symbol.datawedge.api.EXTRA_PARAMETER";
@Override
public IBinder onBind(Intent intent) {
return null;
}
private MediaSessionCompat.Callback mediaSessionCompatCallBack = new MediaSessionCompat.Callback()
{
@Override
public boolean onMediaButtonEvent(Intent mediaButtonEvent) {
Log.d("MEDIAKEY", "Key Event");
return super.onMediaButtonEvent(mediaButtonEvent);
}
};
private MediaSessionCompat mediaSessionCompat;
@Override
public void onCreate() {
Toast.makeText(this, "My Service Created", Toast.LENGTH_LONG).show();
Log.d("SERVICE", "onCreate");
mediaSessionCompat = new MediaSessionCompat(this, "MEDIA");
}
@Override
public void onDestroy() {
Toast.makeText(this, "My Service Stopped", Toast.LENGTH_LONG).show();
Log.d("SERVICE", "onDestroy");
}
@Override
public int onStartCommand(Intent intent, int flags, int startId) {
Toast.makeText(this, "My Service Started", Toast.LENGTH_LONG).show();
Log.d("SERVICE_STARTUP", "onStart");
MediaButtonReceiver.handleIntent(mediaSessionCompat, intent);
mediaSessionCompat.setActive(true);
mediaSessionCompat.setFlags(
MediaSessionCompat.FLAG_HANDLES_MEDIA_BUTTONS |
MediaSessionCompat.FLAG_HANDLES_TRANSPORT_CONTROLS);
mediaSessionCompat.setCallback(new MediaSessionCompat.Callback() {
@Override
public boolean onMediaButtonEvent(Intent mediaButtonEvent) {
Log.d("MEDIA", "event");
Intent i = new Intent();
i.setAction(softScanTrigger);
i.putExtra(extraData, "START_SCANNING");
sendBroadcast(i);
return super.onMediaButtonEvent(mediaButtonEvent);
}
});
return START_STICKY;
}
}
|
Final note
#
Thanks to Maurizio Raimondi and his team in Barware to work with me to build this solution and to put together in a very short time some samples of the headset trigger!


